Get a paper clip
Stick it in the hole for at least FIVE seconds where #11 indicates.

The camera will do a quick reset and you can logon with
admin / Admin_1234
Get a paper clip
Stick it in the hole for at least FIVE seconds where #11 indicates.
The camera will do a quick reset and you can logon with
admin / Admin_1234
Some commands that I fought with but finally was able to make work.
Send key "F2" to a window that might not be active without stealing focus from the active window
In this example, i wanted to first get the actual windows title associated to the executable.
processName := "vMix64.exe"
if (WinExist("ahk_exe " . processName)){
WinGetTitle, title, ahk_exe %processName%
}
ControlSend,, {F2},%title%
Here's a quick and dirty how to make Visca over IP work on a Sony XRG series camera.
The plugin i'm using to test with OBS is PTZ Controls v0.15.4
Install that for your OBS
Then launch it.


In FreePBX create an SIP extension (I'm using SIP, not PJSIP)

Create an extension, give it the display and CID values you want. The rest can remain as default.
Save / apply your changes.


Go into your Grandstream GXW42XX
Go to FXS PORTS -> Port Settings -> FXS X-X


(password will paste, but will show empty after you press Save and Apply
Now go to "PROFILES" (i'm using "Profiles 1" -> General Settings
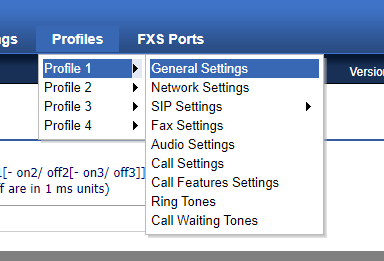
Set the Profile Active to "YES"
SIP server is the IP/FQDN of your asterisk box with the :5061 at the end


root@node01:~# apt -y install open-iscsi root@node01:~# vi /etc/iscsi/initiatorname.iscsi # change to the same IQN you set on the iSCSI target server InitiatorName= iqn.2020-05.world.srv:node01.initiator01 root@node01:~# vi /etc/iscsi/iscsid.conf # line 57: uncomment node.session.auth.authmethod = CHAP # line 61,62: uncomment and specify the username and password you set on the iSCSI target server node.session.auth.username = username node.session.auth.password = password root@node01:~# systemctl restart iscsid open-iscsi # discover target root@node01:~# iscsiadm -m discovery -t sendtargets -p 10.0.0.30 10.0.0.30:3260,1 iqn.2020-05.world.srv:dlp.target01 # confirm status after discovery root@node01:~# iscsiadm -m node -o show # BEGIN RECORD 2.0-874 node.name = iqn.2020-05.world.srv:dlp.target01 node.tpgt = 1 node.startup = manual node.leading_login = No ..... ..... node.conn[0].iscsi.IFMarker = No node.conn[0].iscsi.OFMarker = No # END RECORD # login to the target root@node01:~# iscsiadm -m node --login Logging in to [iface: default, target: iqn.2020-05.world.srv:dlp.target01, portal: 10.0.0.30,3260] (multiple) Login to [iface: default, target: iqn.2020-05.world.srv:dlp.target01, portal: 10.0.0.30,3260] successful. # confirm the established session root@node01:~# iscsiadm -m session -o show tcp: [1] 10.0.0.30:3260,1 iqn.2020-05.world.srv:dlp.target01 (non-flash) # confirm the partitions root@node01:~# cat /proc/partitions major minor #blocks name 7 0 56264 loop0 7 1 56268 loop1 7 2 70624 loop2 7 3 70764 loop3 7 4 27740 loop4 252 0 31457280 sda 252 1 1024 sda1 252 2 1048576 sda2 252 3 30405632 sda3 253 0 26214400 dm-0 11 0 1048575 sr0 8 0 10485760 sdb # added new device provided from the target server as [sdb] |
| [2] | After setting iSCSI device, configure on Initiator to use it like follows. |
# create label root@node01:~# parted --script /dev/sdb "mklabel gpt" # create partiton root@node01:~# parted --script /dev/sdb "mkpart primary 0% 100%" # format with ext4 root@node01:~# mkfs.ext4 /dev/sdb1 mke2fs 1.45.5 (07-Jan-2020)
Creating filesystem with 2617344 4k blocks and 655360 inodes
Filesystem UUID: f4255883-6b01-4ec1-b17c-358f86df1eba
Superblock backups stored on blocks:
32768, 98304, 163840, 229376, 294912, 819200, 884736, 1605632
Allocating group tables: done
Writing inode tables: done
Creating journal (16384 blocks): done
Writing superblocks and filesystem accounting information: done
root@node01:~# mount /dev/sdb1 /mnt root@node01:~# df -hT Filesystem Type Size Used Avail Use% Mounted on udev devtmpfs 1.9G 0 1.9G 0% /dev tmpfs tmpfs 394M 1.1M 393M 1% /run /dev/mapper/ubuntu--vg-ubuntu--lv ext4 25G 2.2G 22G 10% / tmpfs tmpfs 2.0G 0 2.0G 0% /dev/shm tmpfs tmpfs 5.0M 0 5.0M 0% /run/lock tmpfs tmpfs 2.0G 0 2.0G 0% /sys/fs/cgroup /dev/vda2 ext4 976M 103M 806M 12% /boot /dev/loop0 squashfs 55M 55M 0 100% /snap/core18/1705 /dev/loop1 squashfs 55M 55M 0 100% /snap/core18/1754 /dev/loop2 squashfs 69M 69M 0 100% /snap/lxd/14804 /dev/loop3 squashfs 70M 70M 0 100% /snap/lxd/14890 /dev/loop4 squashfs 28M 28M 0 100% /snap/snapd/7264 /dev/sda1 ext4 9.8G 37M 9.3G 1% /mnt tmpfs tmpfs 394M 0 394M 0% /run/user/0 |
Custom Fixture location Windows
C:\Users\USERNAME\QLC+\Fixtures
Start QLC with web controller:
add --web to the target name.


